Editing the Plan

Likely your initial Plan will need some adjusting even after Steps 1 and 2 in Planning Your Meeting were completed.
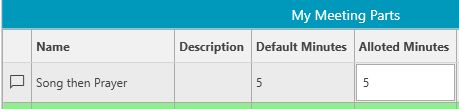
Let's look a the first row in our example Plan:

As the right arrow in the leftmost column indicates, this row is selected for editing.
To edit any row it must first be selected, generally by clicking on it somewhere.
Not only will it then have the right arrow, it's color may change to gray.
Note: Gray can simply indicate your mouse is over a row, not that the row is selected.
To edit a data cell (Description or Allotted Minutes), click it once or twice until the right arrow is replaced with the Edit Indicator and the cell background turns white:
The 10 columns have these functions, left to right:
- First column (no name) has an arrow pointing to the one and only selected row. Arrow changes to Edit Indicator when cell ready for edit.
- Name is the fixed name of the part TYPE and cannot be changed.
- Description can be changed to anything you find helpful. In this case possibly the Song number.
If the speaker is not a Congregation member (as in a Public Talk) you may want to show his name and/or subject here.
- Default Minutes are my guess at the most frequent length of the part TYPE. It cannot be changed.
- Allotted Minutes will initially be the same as Default, but can be changed to any nonzero positive whole number, within reason.
- Select allows you to bring up a Speaker Selection dialog to assign the Speaker (in this case the brother praying) if you already know who it will be.
You do not need to assign a Speaker now; that can be done in all the other Meeting Screens.
Depending on the part, the list of possible speakers may be restricted to just the Congregation's appointed servants, unless you removed that restriction using the checkbox in Step 1. See Adding An Entirely New Meeting
- Speaker indicates whom you chose with Select. It is not otherwise directly editable.
- Up Arrow moves the row's position upward, if possible. The row remains the currently selected row, so repeated presses continue the move upward.
- Delete removes the row entirely AFTER you confirm that is intended.
- Down Arrow moves the row's position downward, if possible. The row remains the currently selected row, so repeated presses continue the move downward.
NOTE #1: Positioning rows can also be done by dragging them from their current position to the new. Unfortunately, in this vendor-supplied grid, this seems to be more awkward than hoped.
NOTE #2: Editing the rows in the Timing and Review screens is more limited. It is usually best to set as many details in advance as you know.